E-paper (sometimes called E Ink) is a fascinating technology. In a time of high refresh rates and 4K displays, it sits there with its sunlight-readable, low-eye-strain qualities and just... displays. Not fast, sure, nor in great detail, but nothing comes close to that painted-on look it achieves.
Colour e-paper has long been a dream of mine, and sadly it's taken a long time for the manufacturers to get anywhere. Full colour is still a way off, but we do, at last, live in the world of two-main-colour e-paper that's easily available for the common maker - your choice of either red/white/black or yellow/white/black!
I finally ordered some colour e-paper from Waveshare a couple of months ago, and after some expectedly slow delivery (it is, after all, coming all the way from China during a pandemic) it landed here a few weeks ago, and so I finally got a chance to make something with it.
E-paper isn't perfect for everything - the slow refresh times are considerably worse with this two-colour variant, so you need something that's relatively static. Thankfully, I already had an idea - a passive, on-wall weather display. It only needs to update every 30 minutes or so, and there's plenty of scope for use of a highlight colour.
The Hardware
The Waveshare e-paper has an option that comes with a Raspberry Pi-compatible hat, and this makes it very easy to get up and going with. Stick it on a Pi with headers, and load up the right software, and you're off.
As such, the actual build here is not very complex, consisting of:
- A 5.83inch red/black e-paper display with Pi hat
- A Raspberry Pi 3 (but any big one with WiFi will work)
- Some M2.5 standoffs (here's an example on Amazon)
- Some laser-cut 3mm acrylic (SVG, Sketch DXF)
That's it! If you don't have access to a laser cutter, wood or 3D printed parts would do just as well.
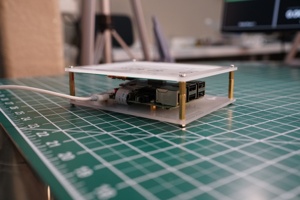
The Raspberry Pi mounts onto the base piece, the e-paper mounts onto the front frame using tape (or if you're more reasonable than I, something a little stronger), and the standoffs hold everything in place. Being a Raspberry Pi, the whole thing can be powered from a single micro USB cable.
Hardware Notes
- You can use M3 standoffs if you like, just be prepared to drill out the holes on the Raspberry Pi to be a little bigger (there's plenty of room on the PCB to do this, just be careful).
- None of the standoffs I had were long enough to space the two levels out correctly, so I just threaded two of them together.
- A Raspberry Pi Zero W might seem like the perfect small form factor for this, but in my tests, it did not have enough power overhead to update the screen and immediately undervolted whenever I tried. It might work better on a smaller e-paper screen.
- The refresh rate on these screens is long. Really long. I measured it at 15 to 20 seconds in some cases (it's in the video at 10:55 if you want to see it).
The Software
I am a fan of relatively "dumb" software on devices like this, just to keep maintenance easier, and so the actual software the Raspberry Pi runs is nothing more than a script that can display images fetched from a URL. This runs using cron, pointed at an app hosted in Google Cloud Run, pulling and updating the image every 30 minutes.
The server itself is a small Flask app that pulls weather information from OpenWeather, mostly as they had a nice convenient single-call API. It renders the image for the display using Pillow, and then outputs that directly into an image for the aforementioned script to display.
The server code is a bit of a mess - please read through it suitably prepared - but it does use palletised mode in Pillow to ensure it's sending images the display can render. When the display says it's three colour - red/white/black - it means it. There's no shades of grey or red, just those three colours, so there's no chance of antialiasing. The palletised mode ensures that it renders text and curves with appropriately hard edges; the fonts don't look great as a result, but I'll get around to investing more in the fonts in future.
The Result
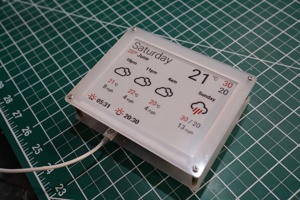
The build was nice and easy - you can see some of it in the video above - and my main miss was putting the Raspberry Pi too low in the mount so I can't sit it on a table with a power cable plugged in (it hangs on the wall now, though, so it's not a problem).
The software is relatively easy to update - thanks to all the brains being on the server, I can just commit a change to the git repo and it continuously deploys straight to the server. It also costs essentially nothing to run thanks to Cloud Run's pricing scheme of only charging you for time spent serving requests.
I would probably have been better served with a yellow/white/black screen given the use of colour for the sun icons and thunderbolts and similar, but the red stands out really well and looks fantastic in person, so I'm honestly not that bothered. A blue/white/black combination would have been perfect, but that's not yet one of the options offered by any of the vendors I found.
I'd love to make more things using these screens, but that super long refresh rate makes it not very viable for anything updating with a frequency of less than a few minutes; the greyscale screens are much better, and so I may poke at some more clock-like or house-status projects using those!
Finally, I would love for the bigger (12-inch) displays to come down in price a bit; there's a lot more you can do with that number of pixels. Here's hoping the progress of time will help fix that one, and eventually get me to the e-paper-based house wallpaper I've always wanted.


