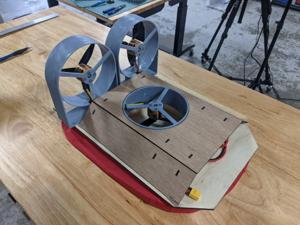
This mini hovercraft was my first build in my Can We Build series, which is essentially a justification to build a whole load of weird things and film it.
It took 3 evenings to build, and a fourth wrap-up day to get some B-roll footage and film the closing remarks, so it fitted quite well into my proposed schedule of "a few days" that I used in the intro. If I ever run longer there, my excuse will be that I meant "the equivalent of a few full days", which given I fit this around work, is more like 5 - 6 days of evenings!
Most of the time slowdown was waiting for 3D printing - I love resin printers, and they produce some lovely results, but my goodness are they slow, even with the new monochrome screens. If I wanted to truly rapidly build this, I think using the laser and the CNC router only would have been the way to go.
Some of these links are affiliate links, and I may get a small kickback, but I don't let that affect my product choice!
Materials
This, like most of these builds, used a lot of random parts I have lying around the workshop (this is one of the advantages of having grown one over the years in my basement and eventually out to its own location), but here's the main materials I used:
- 1/8" (3mm) pre-sanded plywood: It's lighter than MDF and lasercuts pretty nicely. Hopefully available in any hardware store near you.
- 70 denier ripstop nylon (PE coated): I have a lot of utility fabric lying around, but pretty sure this is what I used for the skirt. Lightweight and pretty airtight.
- 5-inch propellers: I think the ones I am using here are these UXCell ones, but you can really choose what you want here.
- Small brushless motors: I'm pretty sure these are the 1450kv ones from RC Electric Parts. They come with XT60 connectors and bullet plugs pre-soldered, which is nice.
- Electronic speed controllers: I started out with these 30A unidirectional ESCs, and then I switched them out for these 40A bidirectional ESCs.
- LiPo Battery: All the tests here were with a nice small 3S 120C 1500mAH LiPo battery, but I have a bigger one I'll swap in for longer runtimes.
- RC Transmitter & Receiver: I had an AT9S Pro lying around from an old drone build, but any 3-or-more-channel TX/RX will work. The AT9S is nice, though, as it comes with an 8-channel receiver and it has a built-in "elevon" mode which will do differential steering for you with two thrust fans!
- XT60 connectors: These are my favourite battery connector and I put them on everything. Any medium-size hobby shop should sell these, or Amazon has umpteen sellers selling ones of varying quality. Not sure where my stash is from, or I'd link it.
- 14AWG (5mm diameter) stranded wire: Again, likely available at any hardware store. Don't use wire that's too small or it'll melt under the current draw.
The 3D prints are made using an Anycubic Photon Mono X, using Elegoo Grey Resin. I like the grey as it has very decent layer times, but any 3D printer with a big enough print bed and any resin will likely work here.
Tool Thoughts
I made significant use of CNC machines here in the Shapeoko and the laser cutter, which is mostly because I'm terrible at cutting out perfect circles, but you could do most of this with a jigsaw and some scissors if you needed to.
I quite like the use of medium-duty staples to secure the skirt - this is often what's done with fabric on chairs anyway, after all. What's not shown in the video is that when I stapled the second skirt, I put the staples much closer together, and that seemed to help with making it pretty airtight (well, as much as a hovercraft skirt needs to be).
Safety Notes
Brushless motors with props attached are dangerous - make sure you are careful around them when they are connected to power and especially if they are not enclosed yet. I had one mis-programmed ESC/motor spin up when I powered off the RC controller and it made a lovely set of cuts on my finger (you can sort of see it healing over in some of these clips).
I wear eye protection at all times when doing anything I perceive as even slightly hazardous, like this, but I added work gloves after that just to make sure, as well as always unplugging the battery before I powered off the transmitter just in case.
Added onto that, be aware of the normal precautions about storing, charging and discharging lithium-polymer (LiPo) batteries, and making sure that the ones you choose can support the current draw.

